Android APK Build Variants — Useful for QA Testing

Imagine you’re a developer amidst the hustle of managing different build types — staging, development, and production. Each has unique testing requirements, and the constant switch feels like a juggling act.
Now, add QA testers to the scene, each with their own demands, making environment management a full-time circus act. However, there’s a savior — Android APK Build Variants. They’re like a backstage crew, ensuring everything’s set for each scene. According to the official Android documentation, build variants allow creation of different app versions from one project, easing the management of dependencies and signing configurations. Whether a free or a paid version, build variants handle them seamlessly.
Creating Product flavors
Creating product flavors is similar to creating build types. Starting from app/build.gradle file, Add product flavors to the productFlavors block in your build configuration.
android {
    namespace 'avinya.tech.buildvariants'
    compileSdk 34

    defaultConfig {
        applicationId "avinya.tech.buildvariants"
        minSdk 24
        targetSdk 34
        versionCode 1
        versionName "1.0"

        testInstrumentationRunner "androidx.test.runner.AndroidJUnitRunner"
    }

    buildTypes {
        debug {
            minifyEnabled false
            proguardFiles getDefaultProguardFile('proguard-android-optimize.txt'), 'proguard-rules.pro'
        }
        release {
            minifyEnabled false
            proguardFiles getDefaultProguardFile('proguard-android-optimize.txt'), 'proguard-rules.pro'
        }
    }

    flavorDimensions "variants"
    productFlavors {
        development {
            applicationId "avinya.tech.buildvariants"
            buildConfigField("String", "BUILD_TYPE", "\"${project.property('DEVELOPMENT_BUILD')}\"")
            dimension 'variants'
        }

        staging {
            applicationId "avinya.tech.buildvariants"
            buildConfigField("String", "BUILD_TYPE", "\"${project.property('STAGING_BUILD')}\"")
            dimension 'variants'
        }

        production {
            applicationId "avinya.tech.buildvariants"
            buildConfigField("String", "BUILD_TYPE", "\"${project.property('PRODUCTION_BUILD')}\"")
            dimension 'variants'
        }
    }

    buildFeatures {
        buildConfig = true
        viewBinding = true
    }
}
We’ve added 3 flavors for our product; you can add as per your needs.
- development — This variant is optimized for rapid development and testing, with configurations set for a debuggable environment.
- staging — Serving as an intermediary between development and production, this variant is geared towards a testing environment that closely mirrors the production setup but with some debugging capabilities enabled.
- production — This is the variant that’s ready for release to end-users, with all debugging capabilities disabled and optimizations for performance and security applied.
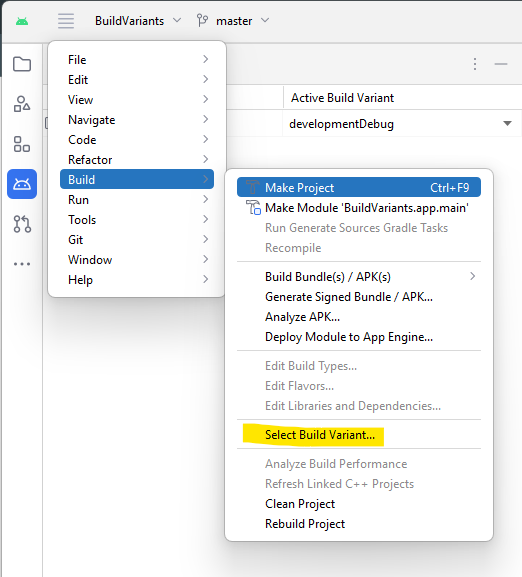
Sync the gradle with project and now you can select the variant which you want to build from the the drop down menu in Build Variants window.
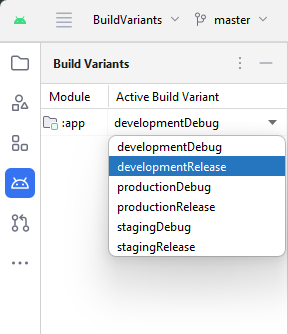
Notice the extra element in each block? That’s a BuildConfig field, set during the build, helping to identify the active build during runtime.
Each field is defined in the gradle.properties file as shown.
DEVELOPMENT_BUILD=developmentBuild
STAGING_BUILD=stagingBuild
PRODUCTION_BUILD=productionBuild
This way, they can be easily accessed within the app.
public class MainActivity extends AppCompatActivity {

    ActivityMainBinding binding;

    @Override
    protected void onCreate(Bundle savedInstanceState) {
        super.onCreate(savedInstanceState);
        binding = ActivityMainBinding.inflate(getLayoutInflater());
        setContentView(binding.getRoot());

        // like this, here the string received will be different for each build
        String buildType = BuildConfig.BUILD_TYPE;

    }
}
Let’s make it more robust and structured now!
Start by creating a package buildutils and create a enum class BuildType
public enum BuildType {

    DEVELOPMENT("developmentBuild"),
    STAGING("stagingBuild"),
    PRODUCTION("productionBuild");

    public String getType() {
        return type;
    }

    private final String type;

    BuildType(String type) {
        this.type = type;
    }

    public static BuildType fromString(String type) {
        for (BuildType buildType : BuildType.values()) {
            if (buildType.getType().equals(type)) {
                return buildType;
            }
        }
        throw new IllegalArgumentException("No enum constant found");
    }
}
Now, this setup looks cleaner and is easier to use. Next, create another class named BuildUtils to access the BuildType.
public class BuildUtils {

    public static BuildType getBuildType() {
        return BuildType.fromString(BuildConfig.BUILD_TYPE);
    }

}
Now it’s almost done! Now, let’s implement this in MainActivity. See the implementation below. It will print the build type in the textView in main_activity.xml.
public class MainActivity extends AppCompatActivity {

    ActivityMainBinding binding;

    @Override
    protected void onCreate(Bundle savedInstanceState) {
        super.onCreate(savedInstanceState);
        binding = ActivityMainBinding.inflate(getLayoutInflater());
        setContentView(binding.getRoot());

        BuildType buildType = BuildUtils.getBuildType();

        String STAGE_MODE = "STAGING";
        String PRODUCTION_MODE = "PRODUCTION";
        String DEV_MODE = "DEVELOPMENT";

        switch (buildType) {
            case DEVELOPMENT:
                binding.textViewBuildType.setText(DEV_MODE);
                break;
            case STAGING:
                binding.textViewBuildType.setText(STAGE_MODE);
                break;
            case PRODUCTION:
                binding.textViewBuildType.setText(PRODUCTION_MODE);
                break;
        }
    }
}
You can also give each build variant its own app name and icon, making them easily recognizable. For a detailed walkthrough, check out my implementation on Github.
GitHub - Meet-Miyani/Build-Variants-Android
I hope you found this article insightful and it helps streamline your QA testing process. If you enjoyed the read or found it useful, please show some love by giving it a clap 👏.
Your support encourages me to share more of what I learn along my development journey. Feel free to share the article with anyone who might find it beneficial. Thank you for your time, and happy coding!