How We Reduced POS Receipt Image Size by 93% — From 81KB Down to 5KB
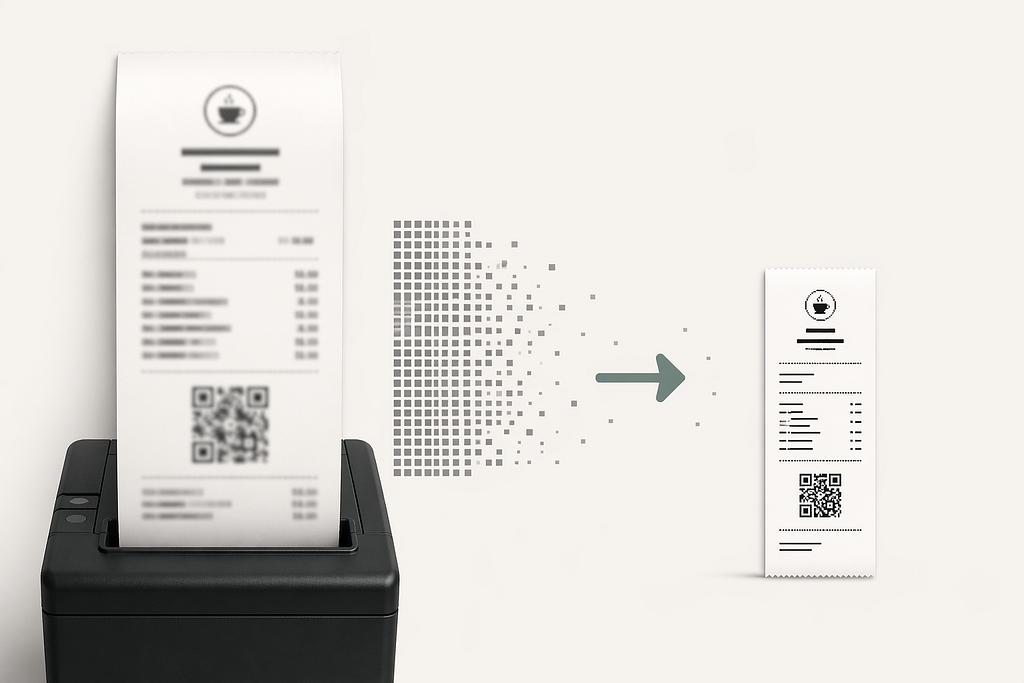
A thermal printer doesn’t care about your beautiful design system. It only speaks one language: black dot, or no dot.
There’s a specific kind of developer conversation that starts as a bug investigation, turns into a rabbit hole, and ends with someone saying “wait — we’ve been doing this completely wrong the whole time.”
This is one of those stories.
It started in an R&D group chat. A bug report came in, suspected to be on the mobile side. It wasn’t. But buried inside that discussion was a throwaway comment about the size of receipt images being generated on the backend. Nobody had thought too deeply about it.
Until we did. And a single afternoon later, we had a 93% file size reduction — with zero loss in print quality. Actually, the print quality got better.
A Brief History of How We Got Here
Our Android app runs on POS devices at restaurant locations. When an order is placed, the device needs to print a receipt. Simple premise. But how we arrived at our current approach is a small evolution that explains exactly why the size problem existed.
Phase 1 — Direct Text Printing (The ESC/POS Era)
In the beginning, we printed receipts the classic way. The app constructed plain text strings and sent them directly to the thermal printer via the device’s native SDK — raw ESC/POS commands that told the printer what to do:
RESTAURANT NAME
--------------------------------
1x Item Name             SAR 25
1x Another Item          SAR  5
--------------------------------
TOTAL                    SAR 30
The commands were tiny. The printer understood them natively. File size? Roughly 500 bytes. Fast, lean, no drama.
But here’s the catch: you have basically zero control over design. Custom font? Nope. Dynamic logo placement? Sort of. Move a field 3 pixels to the left? Good luck. ESC/POS text mode is a typewriter from 1984 — reliable, but inflexible.
Phase 2 — On-Device Image Generation
We moved to generating the receipt as a bitmap image directly on the device. We could now render anything — custom fonts, RTL text, logos, dynamic dividers, brand colors in previews. Total freedom.
The receipt was rendered like a mini view, converted into a bitmap, and that bitmap was handed to the printer SDK. Beautiful.
Until it wasn’t.
Every time we needed to tweak the receipt layout — add a new field, resize a section, change a font — we had to ship a new APK update. Anyone who’s worked with POS device fleets knows that getting an update deployed across every device in the field is not “push a button and go home early.”
Phase 3 — Server-Side Image Generation
The natural solution: move image generation to the backend.
The server generates the receipt image, uploads it, and sends the app a URL. The app downloads the image and sends it to the printer. Now we can change the receipt design with zero APK deployment, zero device coordination, zero waiting.
Clean architecture. The problem, however, had quietly started unpacking its bags.
The Problem Nobody Was Measuring
Once image generation moved to the backend, nobody audited what those images actually weighed.
They looked fine on screen. They printed fine. Nobody complained. So: shipped, and forgotten.
When we finally pulled up the actual numbers, receipts were coming in at 60KB to over 100KB per image, with complex orders pushing close to 200KB.
For context, our specific test receipt — a regular, real-world order — was sitting at 81KB.
Now, 81KB is nothing for a webpage. But consider what’s actually happening here:
- A thermal printer is a 1-bit machine. It either burns a black dot, or it doesn’t. Full stop.
- The receipt content is almost entirely black text on a white background.
- This image is downloaded over a mobile connection on a POS device, on every single order.
- It then gets loaded into memory to be passed to the printer SDK.
We were shipping a truckload of furniture to deliver a single letter.
The Diagnosis: What Was Actually Inside That 81KB?
A standard image generated by any server-side library — canvas render, HTML screenshot, Puppeteer screenshot — comes out as a 24-bit or 32-bit image by default.
Here’s what that means in practice:
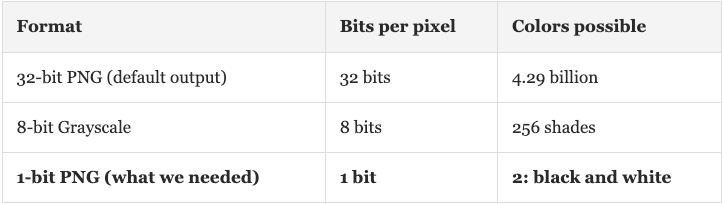
The server was saving 32 bits of color information per pixel — enough to remember whether each dot was one of 4.29 billion possible shades — on an image that used exactly two colors.
On top of that, standard rendering engines use anti-aliasing: they add subtle gray pixels along the curved edges of text to make it look smooth on high-DPI screens. This is exactly what you want on a display. It is completely useless for a thermal printer, which has no concept of gray.
So the image was carrying:
- Gray anti-aliased pixels the printer had to guess at
- 4+ billion unused color possibilities encoded per pixel
- Embedded metadata: creation timestamp, software signature, color profile of a monitor that will never display this receipt, DPI settings for a screen that doesn’t exist in this workflow
All invisible. All weight.
Where the Insight Actually Came From
Here’s the honest version of this story, because it matters.
The core idea didn’t come from an AI assistant. It came from having done enough bitmap work on Android to know how images actually sit in memory — x/y pixel grids, bits per pixel, what a color channel really costs. Once you’ve looked at an image at that level, you stop seeing “a receipt” and start seeing what’s actually encoded in every pixel.
There’s a small analogy I kept coming back to during the debugging session: a photo taken in daylight is almost always larger than the same scene shot at night. Not because the camera tried harder — because daylight exposes more color, more gradients, more variation. More information to encode. Night shots collapse into darker, flatter tones. Less entropy, smaller file.
A receipt is the extreme version of a night shot. It’s basically two tones. So why were we encoding it like a daylight photo with 4.29 billion possible colors per pixel?
That’s the frame that unlocked everything: keep only the colors you actually need, and match the encoding to what the hardware can physically render.
Where AI Actually Helped
Once the direction was clear, I used an AI assistant the way I’d use a well-read colleague at 2 AM — not to find the answer, but to pressure-test it and speed up the boring parts:
- Confirming ImageMagick flag behavior without digging through three layers of man pages
- Sanity-checking why JPEG produces mosquito noise on sharp edges (so I could explain it, not just avoid it)
- Comparing PNG color-type modes and their compression characteristics
- Validating that png:color-type=3 + bit-depth=1 was genuinely the optimal combo and not just a working combo
That’s the honest role AI played here — a research accelerator on top of an insight that came from knowing how bitmaps work. It won’t replace engineers who understand their systems. But once you know what you’re looking for, it’s a pretty great way to stop Googling and start shipping.
The Solution: 1-Bit PNG + Full Metadata Strip
The fix has three parts, each one compounding the last.
1. Convert to 1-Bit Monochrome
Force the image into exactly 2 colors: pure black and pure white. No shades, no palette, no gray.
The math is almost satisfying in how obvious it becomes in hindsight:
32 bits per pixel → 1 bit per pixel = 32× less raw data, before compression even starts
2. Kill the Anti-Aliasing with a Hard Threshold
Apply a 50% brightness threshold during conversion: any pixel darker than halfway becomes pure black, everything else becomes pure white. The anti-aliased gray fringe around every character is completely eliminated. The printer now receives data it was literally built to consume.
3. Strip All Metadata Chunks
PNG files carry hidden “chunks” — packets of metadata that live inside the file but have zero effect on pixels. Color profiles, software credits, timestamps, gamma tables, DPI hints. None of these mean anything to a thermal printer. We remove all of them.
The Implementation: One ImageMagick Command
For the actual processing, we used ImageMagick — specifically the convert CLI tool (or magick on version 7+). Free, battle-tested, runs on any server, and handles this in a single command:
convert input.jpg \
  -threshold 50% \
  -monochrome \
  -strip \
  -define png:exclude-chunk=all \
  -define png:color-type=3 \
  -define png:bit-depth=1 \
  output.png
Breaking down each flag:
-threshold 50% — The anti-aliasing killer. Pixel below 50% brightness? Pure black. Above? Pure white.
-monochrome — Reinforces strict 1-bit conversion. No grayscale leaks through.
-strip — Removes standard EXIF data, embedded color profiles, and common metadata.
-define png:exclude-chunk=all — The nuclear option. Drops every non-essential PNG metadata chunk: software tags, timestamps, calibration data, all of it.
-define png:color-type=3 — Forces indexed palette mode — the most efficient possible encoding for exactly 2 colors.
-define png:bit-depth=1 — Explicitly sets 1-bit depth. One bit. Two states. Perfect hardware match.
Want to squeeze out the absolute last few bytes? Run the output through optipng, a dedicated PNG lossless optimizer that tightens the internal DEFLATE compression without touching a single pixel:
optipng -o7 -strip all output.png
“But What About JPEG? Or WebP?”
Both come up. Both are the wrong answer for this use case.
JPEG is designed for photographs — smooth gradients, natural scenes. When you apply JPEG compression to sharp black text on a white background, it produces what’s called “mosquito noise”: blurry gray halos around every character caused by the algorithm struggling with hard edges it wasn’t designed for. The printed text looks fuzzy, and counterintuitively, the JPEG is larger than the 1-bit PNG. You pay more, get worse output. Pass.
WebP is excellent for web images, but most thermal printer SDKs don’t natively support it. The mobile app would have to decode WebP into a raw bitmap before sending it to the printer — extra CPU, extra RAM, extra failure points. And for a pure black-and-white image, WebP’s size advantage over a 1-bit PNG is essentially zero. More complexity, zero benefit.
1-bit PNG is the correct answer. Every time. For receipts.
The Results — Real Numbers, Real Receipt
Here’s the actual before and after, measured on a real production receipt image:
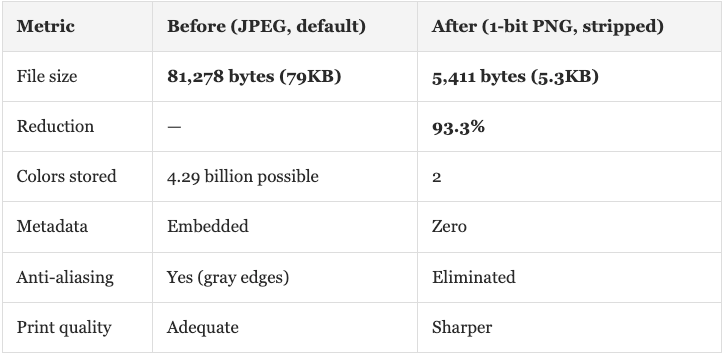
Five kilobytes. For a complete restaurant receipt — logo, multi-language text (yes, this works for Arabic, Hebrew, Latin, anything), itemized order, prices, totals, and footer.
The mobile app downloads it faster. The device memory footprint is smaller. The printer renders it faster because the SDK doesn’t need to run any color conversion math. And the printed text is actually crisper because gray anti-aliased pixels are no longer being dithered into unpredictable black dots.
One More Thing: Width Matters Too
While we’re here — if you’re generating receipt images on a backend, always generate at the exact pixel width your printer expects. Don’t let the app scale it.
- 58mm paper → 384px wide
- 80mm paper → 576px wide
If the image comes down at the wrong width, the device has to rescale it before printing — burning CPU, potentially introducing blur, and sometimes misaligning content. Generate correctly from the start.
For height: let it be dynamic based on order content. Fixed heights lead to either cut-off receipts or a lot of blank paper rolling out at the end, which restaurant partners will absolutely notice and complain about.
The Bigger Takeaway
This whole situation is a reminder that library defaults are designed for the general case, not your specific case.
Standard image libraries default to 32-bit because it works for everything. Rendering engines default to anti-aliasing because screens need it. Backend servers generate images without asking who the consumer actually is.
None of those defaults are wrong. They just weren’t right for us.
The moment we asked “what does a thermal printer actually need?” — and remembered how images are actually stored at the pixel level — the answer was obvious. A 93% improvement came out of a single CLI command, backed by a first-principles look at the format itself.
Sometimes the best optimization isn’t a clever algorithm or a new architecture pattern. It’s understanding the hardware you’re talking to, and speaking its language.
Quick Reference Checklist
If you’re generating receipt images for POS thermal printers, run through this before shipping:
- Output format: PNG (not JPEG, not WebP)
- Color depth: 1-bit monochrome (exactly 2 colors)
- Apply 50% threshold to eliminate anti-aliased gray edges
- Strip all metadata — EXIF, color profiles, software tags, timestamps
- Image width: exact printer pixel width (384px for 58mm / 576px for 80mm)
- Image height: dynamic based on content length
- Optional: run through optipng -o7 for maximum lossless compression
One command and you’re done. Your mobile app, your POS device, and whoever pays the bandwidth bill will all thank you.
Built something similar? Got a different approach? Drop a comment — always curious how others are handling POS receipt pipelines.
Tags: Android POS Thermal Printing Image Optimization ImageMagick Backend Mobile Development Performance